Blog
Backup GoDaddy DNS with Secondary DNS
December 10, 2018
Backing up GoDaddy Premium DNS with Secondary DNS
Secondary DNS is a great way to avoid costly DNS outages and many organizations are moving toward a dual DNS infrastructure. GoDaddy has had their share of DNS outages in the past and no matter who your DNS provider is, it’s a good idea to setup a secondary DNS to help avoid outages
Setting up Secondary DNS is quick and takes less than 10 minutes. This article will highlight the basics on adding Secondary DNS and setting up the DNS to have both GoDaddy and CloudFloorDNS answering DNS requests.
Before you begin, you need a few things. You’ll need GoDaddy Premium services on each domain you want to backup DNS, and you’ll also need A CloudFloorDNS account and an Anycast DNS plan from CloudFloor
Enable Secondary DNS at GoDaddy
In order to enable Secondary DNS on a domain name at GoDaddy, you MUST be using the default GoDaddy name servers with your domain. If you are using EXTERNAL name servers (also known as custom name servers) you must RESET them back to GoDaddy name servers (Default option) for Secondary DNS to become an option on the selected domain name.
To enable Secondary DNS, Login to GoDaddy, and then on your product list next to Domains, click the Text Icon (Plus sign button) to expand the domain list

Click on the MANAGE DNS on the domain name you want to setup Secondary DNS on as shown below

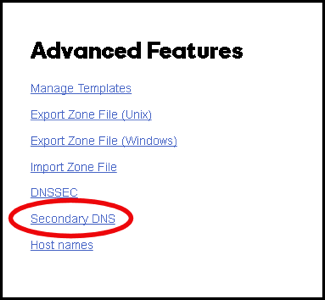
Scroll down and select Secondary DNS. If you don’t see this you may not have enabled Premium DNS enabled.
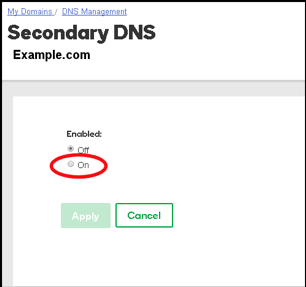
You’ll then see an option to turn on Secondary DNS. Click ON as shown below
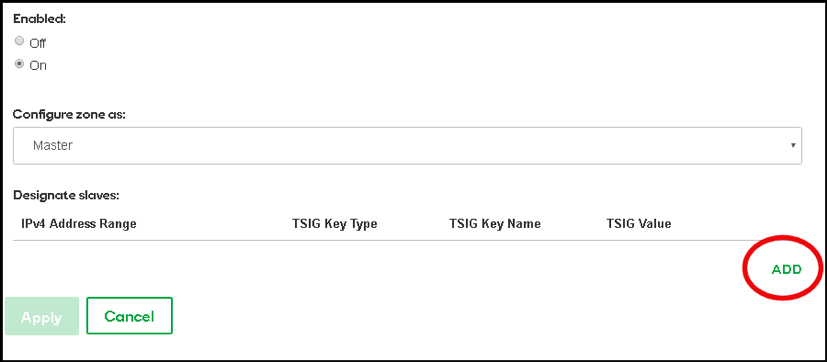
Once Secondary DNS is enabled, you’ll see the Master and Slave option. Select MASTER since we want GoDaddy as the master or primary DNS, and CloudfloorDNS will be the secondary or slave servers. You’ll then see the IP Address option and ADD in the bottom right. Click ADD and go to the next step
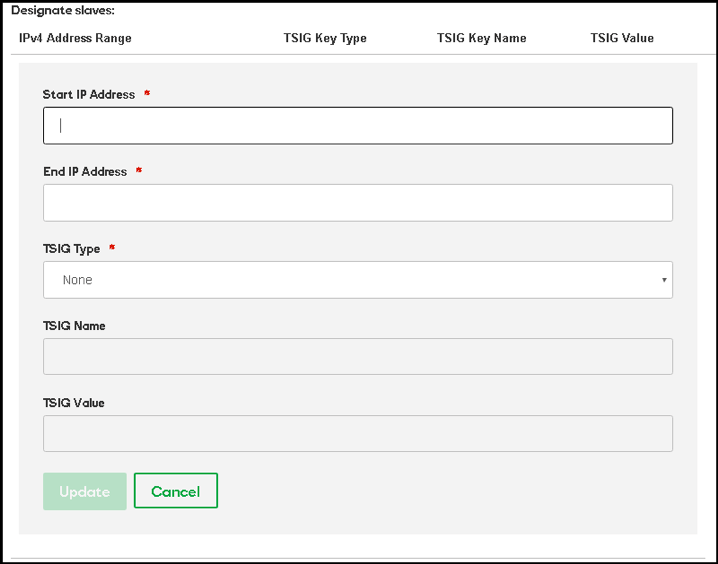
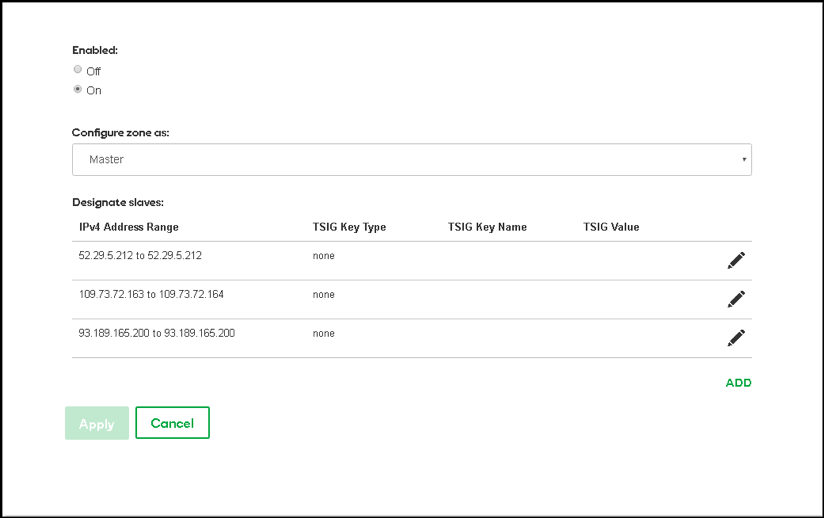
You’ll be presented with the screen below. We need to add in 2 IP Addresses here. This allows the CloudfloorDNS Secondary DNS servers to perform zone transfers from GoDaddy. You’ll then see the screen below. We want to enter in the IP’s of these four servers below. The Start and End IP address should be the same. Enter in each IP below, TSIG should be set to NONE and select UPDATE after each IP. The IP’s are: 52.29.5.212 , 109.73.72.164
Once you’ve added in all the IP’s you’ll see them listed similar to the screenshot shown below
That’s it on the GoDaddy side for now, we’ll come back to GoDaddy in the last few steps to add CloudfloorDNS to the delegation. Now we need to login to our CloudfloorDNS account at https://Panel.CloudfloorDNS.com
Add Secondary DNS on your CloudfloorDNS account
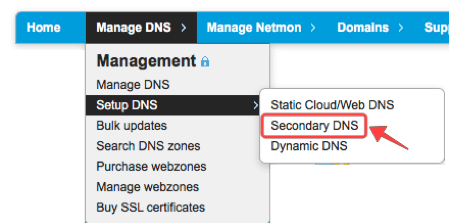
Login to CloudfloorDNS and select MANAGE DNS, SETUP DNS, SECONDARY DNS as shown in the screenshot below:
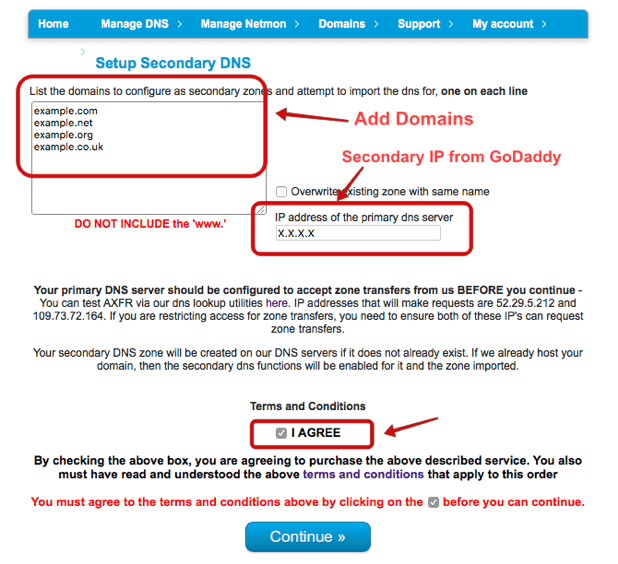
You now add your Domain name(s) that you’ll be using to setup Secondary DNS. Add them to the list as shown below. Enter domains one per line, or a single domain. You also need to enter the IP Address from GoDaddy where you’ll be pulling zone information from. GoDaddy has two servers for AXFR transfers, they are:
domaincontrol.com (72.167.238.111) & xfr04.domaincontrol.com (72.167.238.110)
To be sure you have the latest AXFR server IP’s from GoDaddy, see this article:
https://www.godaddy.com/help/enable-secondary-dns-with-godaddy-nameservers-as-masters-23910
Enter in either one of the IP’s where it asks for PRIMARY DNS SERVER as shown below. We used 72.167.238.111 and then clicked continue.
You’ve now added the secondary zone and it’s ready to be replicated. Replication will take place immediately and every time you make a change at GoDaddy, it will send a NOTIFY and the Secondary DNS will be updated.
The last step in the process is to add CloudfloorDNS Anycast Name Servers into your public delegation for your domain. Login to GoDaddy, and then on your product list next to Domains, click the Text Icon (Plus sign button) to expand the domain list
Click on the MANAGE DNS on the domain name you setup for Secondary DNS earlier as shown below
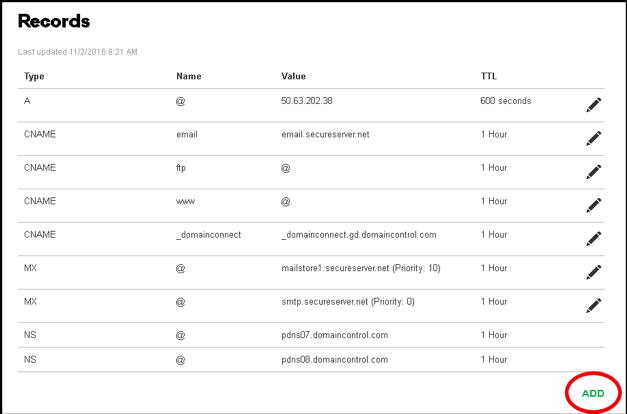
You’ll now see the DNS records for the domain name similar to the screenshot shown below. We want to Add some Name Server records so the secondary DNS starts working at CloudfloorDNS
Click the Add button in the lower right corner and we want to add in each of the following name servers. This means we will have to do this four times. Please note your name servers may be different since CloudfloorDNS uses DNS pools for optimum performance
ns1.g02.cfdns.net
ns2.g02.cfdns.biz
ns3.g02.cfdns.info
ns4.g02.cfdns.co.uk
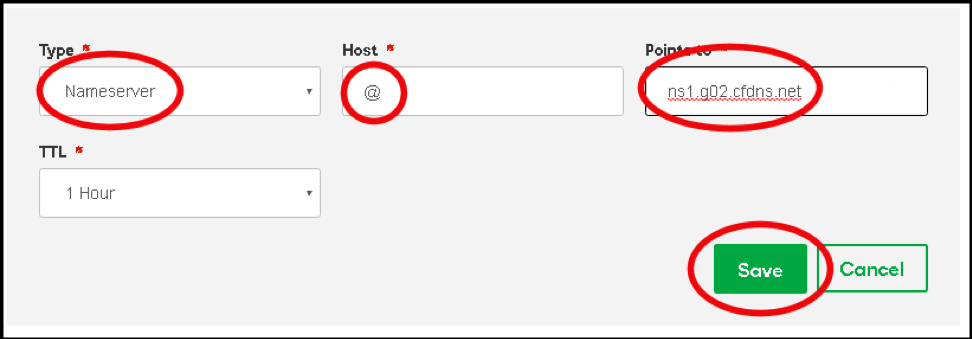
Enter in each server listed above as shown in the screenshot below. Set the Type to NAMSERVER, host should be the @ symbol, and enter the name server name and click the SAVE button. Do this once for each nameserver.
You should now see the name servers you added look similar to the screenshot below. Keep in mind your name server assignments may be different from the example below. Double check your entries and make any necessary changes. You should login to CloudfloorDNS once more and perform a manual zone update as described in earlier steps. This will ensure the data is replicated across properly.
That’s it! You can now edit/update DNS at your Primary as you always have done and CloudFloorDNS will Synch automatically
CloudFloorDNS will now participate in the DNS answering process along with GoDaddy. Should there ever be an issue with GoDaddy and a DNS outage occurs, CloudFloorDNS will continue to answer. If your DNS provider offers DNS stats, you will see DNS queries drop at your Primary DNS provider and CloudfloorDNS will start to balance out the DNS Queries, taking approximately half of the DNS responses. You can check your stats and replication status under the Domain Management panel at any time.
