CloudFloor DNS Logo
CloudFloorDNS Icon

Backup GoDaddy DNS with Secondary DNS

Backup GoDaddy DNS with Secondary DNS

Backing up GoDaddy Premium DNS with Secondary DNS

Secondary DNS is a great way to avoid costly DNS outages and many organizations are moving toward a dual DNS infrastructure. GoDaddy has had their share of DNS outages in the past and no matter who your DNS provider is, it’s a good idea to setup a secondary DNS to help avoid outages

Setting up Secondary DNS is quick and takes less than 10 minutes. This article will highlight the basics on adding Secondary DNS and setting up the DNS to have both GoDaddy and CloudFloorDNS answering DNS requests.

Before you begin, you need a few things. You’ll need GoDaddy Premium services on each domain you want to backup DNS, and you’ll also need A CloudFloorDNS account and an Anycast DNS plan from CloudFloor

Enable Secondary DNS at GoDaddy

In order to enable Secondary DNS on a domain name at GoDaddy, you MUST be using the default GoDaddy name servers with your domain. If you are using EXTERNAL name servers (also known as custom name servers) you must RESET them back to GoDaddy name servers (Default option) for Secondary DNS to become an option on the selected domain name.

To enable Secondary DNS, Login to GoDaddy, and then on your product list next to Domains, click the Text Icon (Plus sign button) to expand the domain list

GoDaddy DNS

Click on the MANAGE DNS on the domain name you want to setup Secondary DNS on as shown below

GoDaddy Setup Secondary DNS

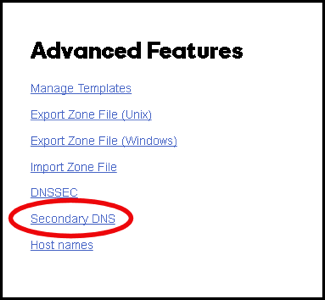
Scroll down and select Secondary DNS. If you don’t see this you may not have enabled Premium DNS enabled.

GoDaddy DNS Secondary DNS

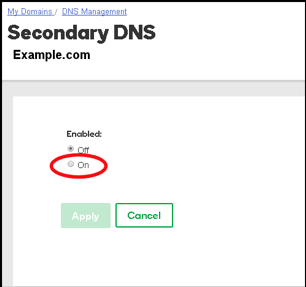
You’ll then see an option to turn on Secondary DNS. Click ON as shown below

Enable Secondary DNS at GoDaddy

Adding Secondary DNS at GoDaddy DNS

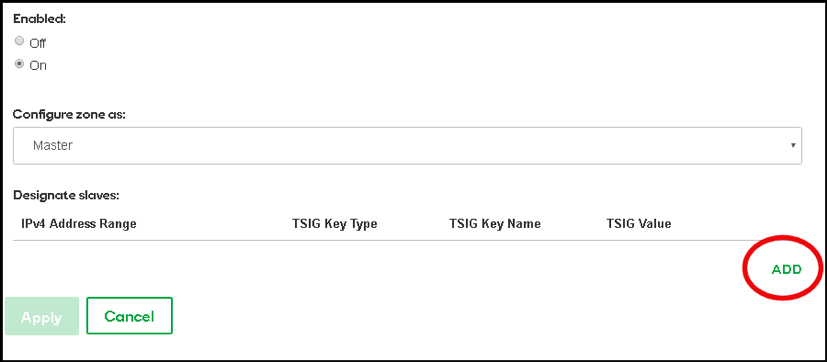
Once Secondary DNS is enabled, you’ll see the Master and Slave option. Select MASTER since we want GoDaddy as the master or primary DNS, and CloudfloorDNS will be the secondary or slave servers. You’ll then see the IP Address option and ADD in the bottom right. Click ADD and go to the next step

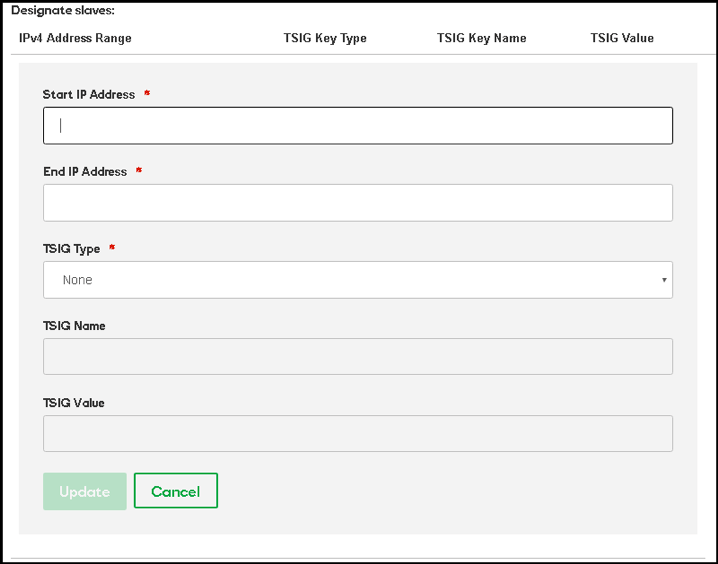
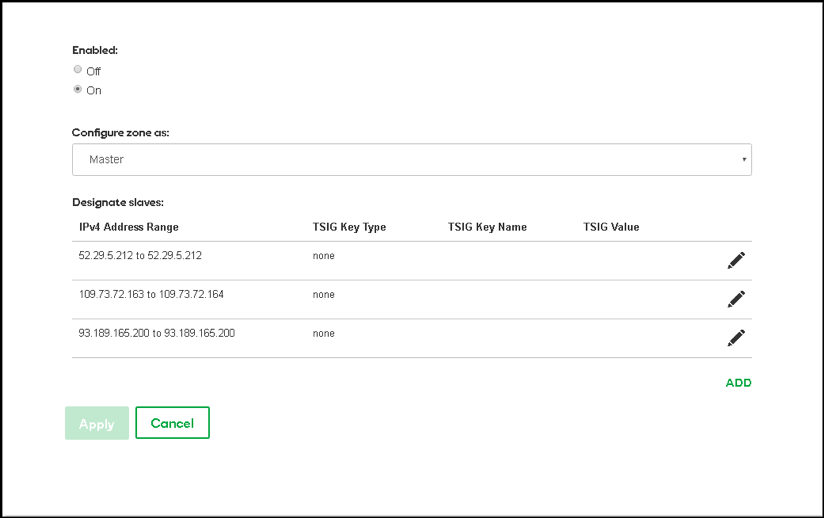
You’ll be presented with the screen below. We need to add in 2 IP Addresses here. This allows the CloudfloorDNS Secondary DNS servers to perform zone transfers from GoDaddy. You’ll then see the screen below. We want to enter in the IP’s of these four servers below. The Start and End IP address should be the same. Enter in each IP below, TSIG should be set to NONE and select UPDATE after each IP. The IP’s are: 52.29.5.212 , 109.73.72.164

Adding Secondary DNS IPs

Once you’ve added in all the IP’s you’ll see them listed similar to the screenshot shown below

AXFR Ip's at GoDaddy DNS for Secondary DNS

That’s it on the GoDaddy side for now, we’ll come back to GoDaddy in the last few steps to add CloudfloorDNS to the delegation. Now we need to login to our CloudfloorDNS account at https://Panel.CloudfloorDNS.com

Add Secondary DNS on your CloudfloorDNS account

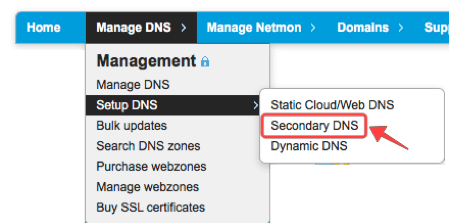
Login to CloudfloorDNS and select MANAGE DNS, SETUP DNS, SECONDARY DNS as shown in the screenshot below:

Setup Secondary DNS at CloudFloorDNS

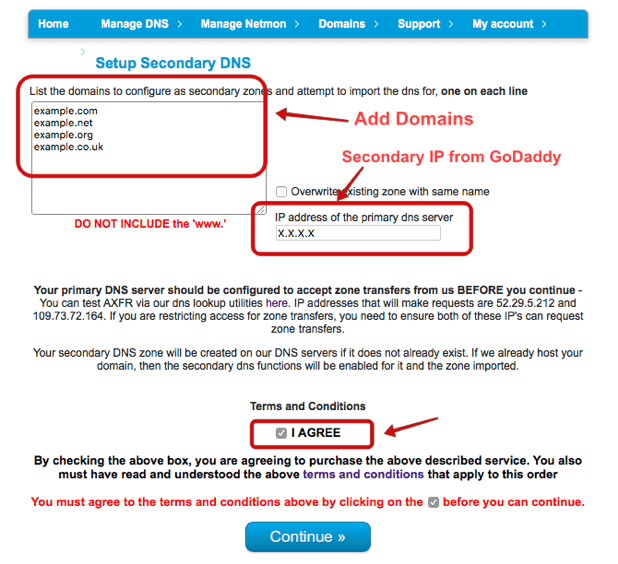
You now add your Domain name(s) that you’ll be using to setup Secondary DNS. Add them to the list as shown below. Enter domains one per line, or a single domain. You also need to enter the IP Address from GoDaddy where you’ll be pulling zone information from. GoDaddy has two servers for AXFR transfers, they are:
domaincontrol.com (72.167.238.111) & xfr04.domaincontrol.com (72.167.238.110)

To be sure you have the latest AXFR server IP’s from GoDaddy, see this article:
https://www.godaddy.com/help/enable-secondary-dns-with-godaddy-nameservers-as-masters-23910

Enter in either one of the IP’s where it asks for PRIMARY DNS SERVER as shown below. We used 72.167.238.111 and then clicked continue.

Adding Secondary DNS domains at CloudFloorDNS

You’ve now added the secondary zone and it’s ready to be replicated. Replication will take place immediately and every time you make a change at GoDaddy, it will send a NOTIFY and the Secondary DNS will be updated.

The last step in the process is to add CloudfloorDNS Anycast Name Servers into your public delegation for your domain. Login to GoDaddy, and then on your product list next to Domains, click the Text Icon (Plus sign button) to expand the domain list

GoDaddy DNS

Click on the MANAGE DNS on the domain name you setup for Secondary DNS earlier as shown below

GoDaddy Setup Secondary DNS

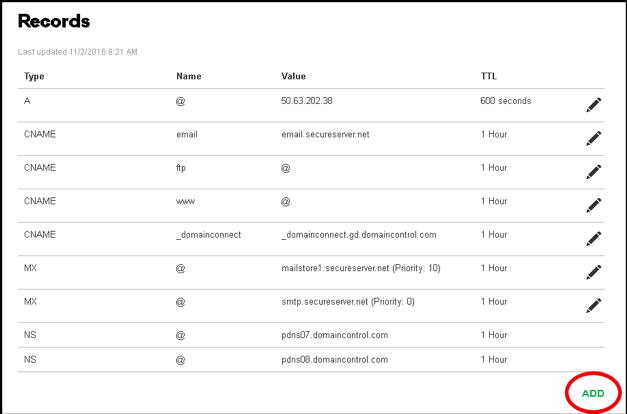
You’ll now see the DNS records for the domain name similar to the screenshot shown below. We want to Add some Name Server records so the secondary DNS starts working at CloudfloorDNS

GoDaddy Premium DNS Setup Secondary DNS

Click the Add button in the lower right corner and we want to add in each of the following name servers. This means we will have to do this four times. Please note your name servers may be different since CloudfloorDNS uses DNS pools for optimum performance

ns1.g02.cfdns.net
ns2.g02.cfdns.biz
ns3.g02.cfdns.info
ns4.g02.cfdns.co.uk

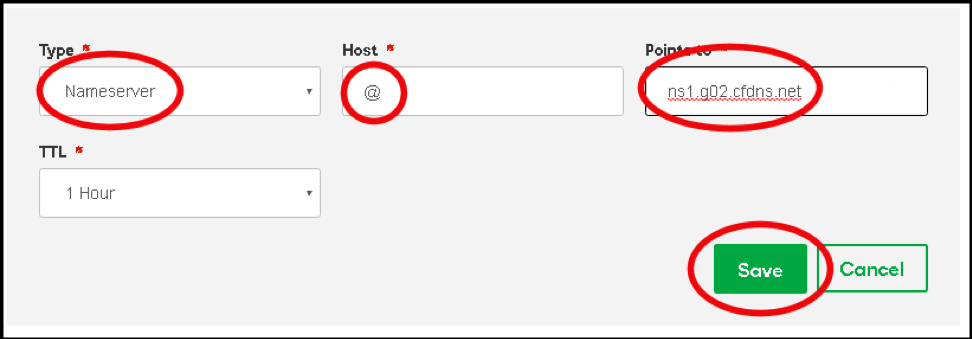
Enter in each server listed above as shown in the screenshot below. Set the Type to NAMSERVER, host should be the @ symbol, and enter the name server name and click the SAVE button. Do this once for each nameserver.

Add NS Records at GoDaddy Premium

You should now see the name servers you added look similar to the screenshot below. Keep in mind your name server assignments may be different from the example below. Double check your entries and make any necessary changes. You should login to CloudfloorDNS once more and perform a manual zone update as described in earlier steps. This will ensure the data is replicated across properly.

GoDaddy DNS Servers

That’s it! You can now edit/update DNS at your Primary as you always have done and CloudFloorDNS will Synch automatically

CloudFloorDNS will now participate in the DNS answering process along with GoDaddy. Should there ever be an issue with GoDaddy and a DNS outage occurs, CloudFloorDNS will continue to answer. If your DNS provider offers DNS stats, you will see DNS queries drop at your Primary DNS provider and CloudfloorDNS will start to balance out the DNS Queries, taking approximately half of the DNS responses. You can check your stats and replication status under the Domain Management panel at any time.
Want to speed up your online operations? Start with DNS

Looking to Improve your Web Performance? Start with DNS

Start with DNS to improve your web performance

Many organizations are flocking to the cloud for their websites and hosted applications for increased performance. The cloud takes the chore out of provisioning servers and adds a layer of simplicity to scale out performance as the need escalates with just a few clicks. Having a large network of fast servers at the ready helps with scalability, but it’s only part of the equation to optimum web performance.

DNS is often overlooked when it comes to your Internet operations performance, yet it’s often one of the most critical components in the chain when squeezing out every ounce of speed. Every web page and app have resources and objects that are required to load for the page or app to be usable. Some web pages and apps can have hundreds of these, each one taking a few milliseconds to load. Each of these resources are typically hosted on your servers and thus need a DNS request to process each item. Slow DNS means slowdowns when fetching these resources, and the end result is slow page and app rendering.

Mix slow anything with today’s ever-impatient consumers and you have a problem. Today’s online visitors will wait for a second or two until they leave your site in search of the products or services they are looking for. Marketing research proves it – slow site means a loss of clients and revenue to faster, more convenient competition.

Since DNS is at the bottom of the commonly thought of technology chain when it comes to online operations, it makes sense to start there. Select a Managed DNS provider that offers a fast global Anycast DNS network along with advanced DNS services like DNS Load BalancingGEO DNS and DNS Failover. Anycast DNS will speed up your operations from the start, and advanced DNS services can greatly increase uptime, scalability and brand availability.

When it comes down to it, it’s all about maintaining the foundation of your Internet presence and that begins with DNS. DNS resides at the core of all online activities and without it the Internet wouldn’t exist as it does today. With a fast, consistent availability of your online presence you will continually maintain the loyalty and confidence of your current clients and satisfy future customers.

Have you checked your Web Performance lately? CloudfloorDNS can help you examine your current performance and provide solutions to instantly increase your DNS speed, reliability and flexibility.

Hurricanes, Floods and Natural Disasters and what they mean to your Online Business

Another Hurricane is on the way, what does that mean to your online business?

Evacuations are already underway in Southern Florida for incoming hurricane Michael and homes and businesses are fortifying their defenses to help protect them from the wrath of this storm. Many online businesses may not realize one of their data centers is in the path of the hurricane and can lose one of their valuable (and possibly primary) hosting locations. For most online organizations, losing a datacenter can wreak havoc with online operations causing email, websites, apps, vpn, phone system and more going belly up. That’s why it’s important to have a plan for disaster prevention/recovery with services that can keep things running smoothly.

Downtime and loss of service from an outage will put a massive dent in your books and can cost many thousands of dollars per minute depending on the size of the business. Avoiding these outages are impossible when it comes to natural disasters, so most business take action to migrate and balance to multiple data centers, avoid a single point of failure. Some of these techniques rely on good ol’ DNS – mainly load balancing and server monitoring/failover based on data center or server health. It’s also a plus that these DNS services are cloud-based and relatively low cost compared to an outage. DNS load balancing provides a simple and effective way of distributing load across multiple servers and data centers, reducing a total outage should one go down. Performance may be degraded, but you’ll still be online!

Adding on DNS failover with endpoint monitoring and now you have an automated platform that can detect server or data center health and automatically failover to a backup. Detecting health involves monitoring a server IP or data center gateway IP and if multiple locations report downtime, the failover is activated. Failover can also be activated on latency, so as a location becomes degraded, you can detect this and activate a failover scenario and removing the degraded host from the load balancing group. A simple, low cost and effective method to add performance and uptime in almost no time. It’s all done with the magic of DNS and best of all it can be deployed quickly and without hardware!

CNAME Failover – DNS Failover for Disaster Prevention & Remediation

CNAME Failover – instant Disaster prevention using Server Monitoring & DNS

CNAME Failover let’s you utilize the benefits of DNS Failover without having to move your DNS to a new managed DNS provider. This let’s you get DNS failover and use it with any DNS provider such as GoDaddy, Verisign, Network Solutions, Ghandi, 1&1 and others. Setup is a breeze and all you need to do is simply change one A-Record in your current DNS and CNAME that to a domain name CloudFloorDNS provides for you. That’s it!

CNAME Failover can be setup quickly and easily and best of all it’s low cost. Once you have your CNAME selected (yournamehere.cfdnsfo.com) you can then setup the monitoring component that tests your server or web application. In most cases it’s a web server, but you can also use CNAME failover with other services and domains if your primary ISP goes down. A good example would be Failing over several hostnames when your primary ISP goes down. We setup a Netmon monitoring agent to test your primary ISP gateway or firewall to determine it’s up. Once we determine the Primary ISP has failed and is no longer responding, we update your CNAME to the backup IP you provide in the Failover. Our low TTL times allow the DNS record to propagate quickly and since your name is CNAMED to ours, you don’t have to change a thing at your current DNS provider

In order to use Failover you must use a monitoring component. Our Patented DNS and Failover platform offers you a way to set up a monitoring test and also provides you with the ability to test the service/server/app every minute from up to seven global locations. False positives (False Alarms) are a thing of the past, we require 3 or more test locations to fail before we kickoff the failover DNS change to the backup. We then notify you that we’ve detected a failure while we are changing the DNS. If you’d like you can enable Fail-Back we can even switch the DNS back to the primary when it comes back up.

Want to learn more about our CNAME Failover service? Watch a video on how CNAME Failover works or reach out and contact one of our DNS Experts for demo and proof of concept.

The importance of securing your website or web app with an SSL Secure Certificate

The importance of enabling SSL Security (HTTPS) on all of your websites

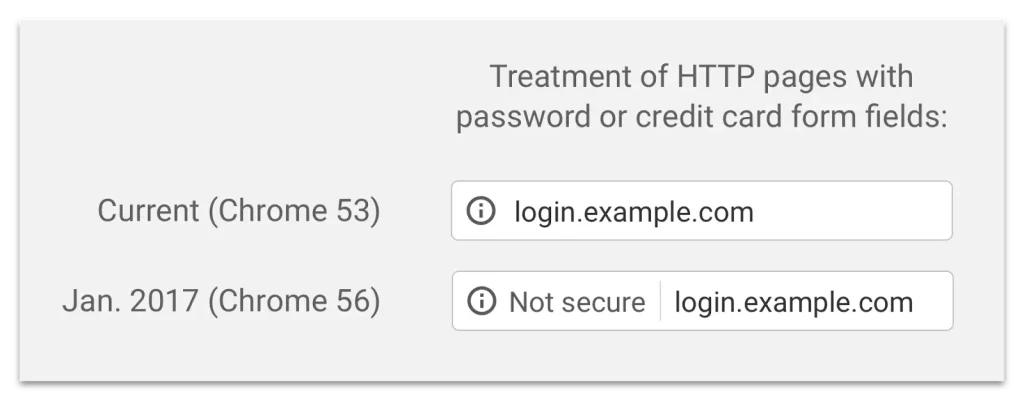
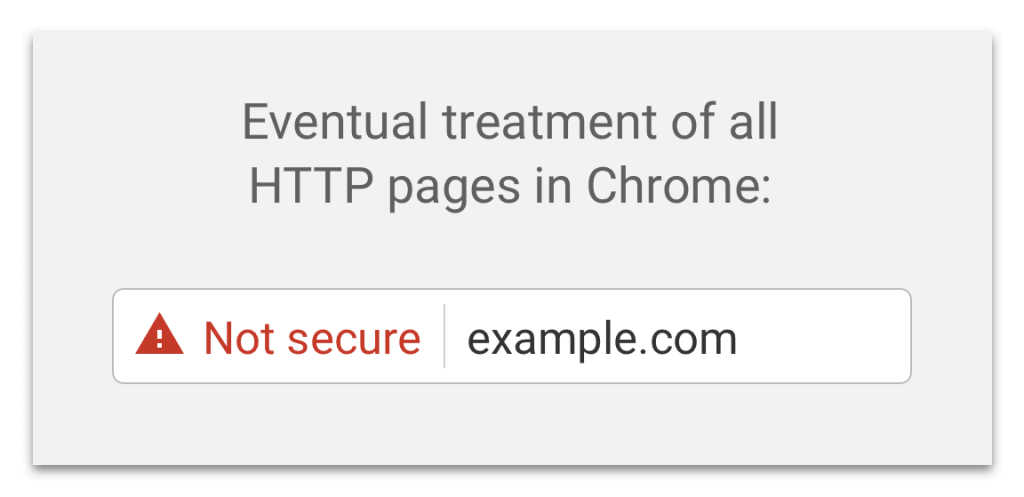
Google is constantly focused on internet security and in recent months have been enforcing more security in their popular Google Chrome browser. The Chrome browser is pushing security (HTTPS) and is now warning users in the browser just to the left of the website as shown in figure 1-1 below. This means all users of Google Chrome browser (the world’s most popular browser) now see this secure or non-secure badge for every website they visit that is not using HTTPS. Starting in July 2018 this warning will be large as shown in figure 1-2 and can’t be missed. This large warning can possibly scare people away from your website if it’s not protected with HTTPS!

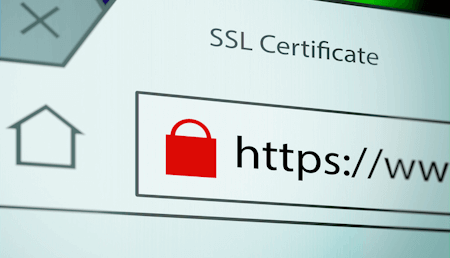
SSL/TLS are encryption mechanisms that help protect the data from your browser to the server across the internet. This keeps any passwords, credit cards and other sensitive data away from prying eyes. In the old days this technology was mainly assigned to any form where credit cards were taken, but now with prying eyes everywhere, google suggests all websites turn on security by installing secure certificates. Once installed, browsers will no longer show the warning and show the green lock and “secure” as shown in figure 1-3

Examples of non-secure website warnings in google chrome
(Figure 1-1) How it looks in the Chrome browser when users visit a Non-Secure website or web-based application
How non-secure pages will look in google chrome
(Figure 1-2) In future versions this is what a user will see during a visit to a Non-Secure website or web-based application

Why would you want to secure your website or web-based application?

There are several factors that would make you want to do this but first and foremost is security for your site and your users and it also helps your visitors to know you care about their security as well. There are other benefits to switching to HTTPS for your website such as increased speed, enhanced SEO or Google page rank and keeping your website or app user friendly. It’s a well know fact that Google has almost 60% of the browser market share which means over half of your users may now be “warned” that your website isn’t secure if you don’t do this. This new browser warning (figure 1-2) can literally scare away new and current users and make them less likely to come back. If you don’t enable HTTPS by installing a secure certificate, you could be pushing your online business slowly out of business!

What is a secure certificate?

A secure certificate or also known as an SSL certificate is a digital file that the web developer or webmaster installs on their web server to enable security. Once installed it creates and verifies the “chain of trust” from the CA or certificate authority, server and browser. It then enables the encryption (HTTPS) so your users can then browse securely, pay for services and other activities on the server and prevents your data and user data from falling into the wrong hands.

a secure website in google chrome
(Figure 1-3) How it will look in the Chrome browser when users visit a SECURE website or web-based application

How do I make my site secure if I run a website or host a web-based app?

Easy, you can purchase and install a secure certificate for your domain on your web server or web-based application server. You can purchase SSL Certificates here or typically at your registrar or web host. There are many different levels of secure certificates, encryption and validation and it’s best to review what’s best for your business and your customers before you purchase a secure certificate. Overall pushing your websites and web-based applications will be a smarter move for your online business and will help protect both your business and your customers well into the future!